Even though IKEA has discontinued the Hemnes line, these ideas are worth your time. Plenty of units still circulate on Facebook Marketplace and OfferUp, often at steep discounts. Whether you already own one or you're hunting for a secondhand deal, here's how to transform it.
Key Takeaways
- Always prime IKEA laminate with a shellac-based primer before painting — skipping this step causes peeling
- New hardware alone (such as aged brass pulls or matte black bar handles) can dramatically change the cabinet's look without any paint or cutting
- Two units joined side-by-side create a convincing built-in look for around $100–$150 total
- The IKEA GULLABERG is the closest current replacement for the discontinued Hemnes
- For entryways that need more storage than flat-pack allows, custom mudroom cabinetry offers a tailored, lasting solution
Why the IKEA Hemnes Shoe Cabinet Is a DIY Favorite
The Hemnes earns its reputation as a hacker's canvas through a combination of real-wood construction, a slim profile, and a price point that keeps experimentation low-stakes.
The 2-compartment version (35 x 11.75 x 50 in.) uses solid pine in its major visible components — real wood that sands, stains, and paints cleanly. The 4-compartment version (41.3 x 8.6 x 42.1 in.) is largely particleboard with foil and melamine surfaces, which requires different prep but is still very workable. Both share a slim footprint that fits narrow hallways and a closed-door design that keeps shoes out of sight.
What made it a hacker's canvas:
- Accepts trim, molding, and hardware changes on flat door fronts with minimal prep
- Blends into almost any style direction without fighting the design
- Secondhand units typically sell well under $100, so a failed paint attempt doesn't sting
One practical note: the black-brown finish version is easier to prep and repaint than the glossy white. White surfaces are harder to get primer to stick to without thorough sanding.
Hack 1: The Paint and Hardware Refresh
A coat of paint and a hardware swap take a weekend and cost surprisingly little — it's the most direct path to making the Hemnes look deliberate rather than default.
Getting the Paint to Actually Stick
Most people go wrong here. Skipping primer on a laminate or foil-finished surface almost guarantees peeling within months.
The right sequence:
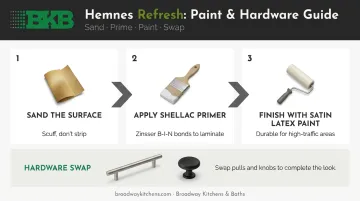
- Lightly sand the exterior — you're scuffing the surface, not stripping it
- Apply a shellac-based primer like Zinsser B-I-N, which bonds to glossy surfaces without extensive prep. Apartment Therapy specifically recommends shellac primer for high-traffic laminate IKEA furniture as the critical first step
- Finish with satin-sheen latex paint — satin holds up well in high-traffic spaces like entryways
Satin is the practical default here — durable and easy to clean. Semi-gloss is worth considering if you're in a busy household with kids or pets.
Color Directions That Work
- Matte black — bold, graphic, pairs with brass hardware for a high-contrast look
- Deep navy or forest green — moody and sophisticated in a narrow hallway
- Soft white or warm cream — clean, Scandi-inspired, makes small spaces feel larger
Hardware That Makes the Difference
Swapping the default knobs is the single fastest change you can make. A matte black bar pull (around $6.37 at Home Depot) or ceramic knobs ($5–$13 depending on pack size at Target or Lowe's) immediately makes the whole piece feel considered rather than stock.
Aged brass tab pulls work especially well on darker painted cabinets — the warm metal against a deep color reads expensive without being expensive.
Hack 2: The Shaker-Style Upgrade with Trim and Fluted Panels
This is the intermediate-level project that delivers a genuinely dramatic result. The technique: frame each door panel with a slim PVC trim border to create a shaker-style profile, then fill the interior with fluted panel material for texture and depth.
Step-by-Step Process
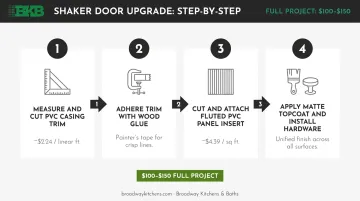
- Measure and cut PVC casing trim to frame each door panel — Royal Mouldings PVC casing runs about $17.94 for 8 linear feet at Home Depot (~$2.24/linear ft)
- Adhere trim with strong wood glue, clamping or taping while it dries. Painter's tape keeps lines crisp during application
- Cut fluted PVC panel material to fit inside the trim border — Art3d fluted PVC paneling is available at Home Depot for around $4.39/sq ft
- Attach the fluted insert with adhesive and let cure fully before painting
One Tip Most Tutorials Skip
Sand the fluted pole wrap before painting. The material can look smooth but will snag and fuzz when you try to wipe it or brush on paint. A light pass with fine-grit sandpaper before you paint eliminates this completely — then seal with a matte topcoat once done.
Finishing the Look
Apply a matte topcoat over the entire cabinet — doors, body, new panels — so everything reads as one cohesive surface. Then install your hardware. Aged brass tab-style or bar pulls complement the shaker profile and give the finished cabinet a genuinely custom look.
That brings the full scope into view. Total project cost: Expect to spend around $100–$150 covering trim, panel material, primer, paint, and hardware. No structural changes are required, making it fully rental-friendly.
Hack 3: Joining Two Cabinets for a Built-In Look
Two Hemnes units placed side-by-side and bolted together stop looking like IKEA furniture and start looking like something a carpenter built. This is the most transformative option, ideal for covering an awkward wall section or filling a full hallway with seamless closed storage.
The 4-compartment version works best here, as it maximizes storage depth while keeping the overall profile slim.
The Joining Process
This is intermediate DIY territory. Watch a tutorial video before attempting:
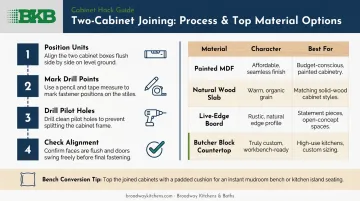
- Position both units flush against each other, level and aligned
- Mark your drill points on the inner side panels — measure carefully, and use painter's tape on your drill bit to mark depth so you don't go all the way through
- Drill pilot holes through the adjoining panels and bolt the units together
- Check alignment before fully tightening
A YouTube tutorial documenting this exact process has over 109,000 views. It's a well-traveled path, though it takes patience to get the alignment right.
Topping the Joined Units
Once joined, you'll want a unified top surface. Options:
| Top Material | Effect | Notes |
|---|---|---|
| Painted MDF panel | Seamless, clean | Most affordable option |
| Natural wood slab | Warm, organic | Adds visual weight |
| Live-edge board | Rustic, organic feel | Hardwood Reflections options available at Home Depot |
| Leftover countertop | Truly custom | Butcher block works well |
When finished with a solid wood or countertop surface, the joined cabinet doubles as a mudroom bench — add a cushion or upholstered pad on top and it becomes a functional seat for putting on shoes.
A few practical notes before you start:
- Joining two units creates a redundant center leg — it can be removed or tucked away without affecting stability
- Both units can often be found on Facebook Marketplace or Craigslist for well under retail price
- If you're planning to paint, prioritize black-brown finish units; the white glossy surface is the harder starting point
Finishing Touches: Styling the Top and Surrounding Space
The hack itself is only half the result. How you treat the surface above and around the cabinet determines whether the entryway feels finished or improvised.
A simple vignette that works:
- A small cluster of framed prints above the cabinet (odd numbers read better than even)
- One tall, sculptural object at one end — a vase, a branch, a lamp
- A small tray on the surface for keys, coins, or mail
Keep the top functional — two or three objects hit the right balance without tipping into clutter.
Carry the hardware finish through the rest of the space, too. Aged brass on the cabinet? Warm-toned textiles, woven baskets, and wood accents above it reinforce the palette. Matte black hardware? Lean into contrast — white walls, minimal styling, clean lines.
The Hemnes Is Discontinued: Your Options Now
Apartment Therapy reported in March 2025 that the Hemnes shoe cabinet was labeled "last chance to buy" on IKEA's website, with no plans to restock once inventory sold out. IKEA's own product pages for remaining Hemnes units showed "Last chance" notices during research.
The Current IKEA Replacement: GULLABERG
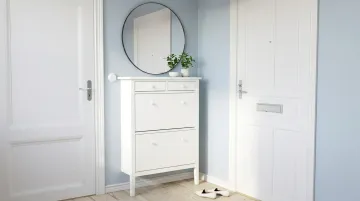
The IKEA GULLABERG is the closest current alternative: similar footprint, similar compartment-style closed-door design.
| GULLABERG Model | Price | Dimensions | Capacity |
|---|---|---|---|
| 2-compartment, white | $179.99 | 34⅝ x 11¾ x 48 in. | 14 pairs |
| 2-compartment, gray | $139.99 | 34⅝ x 11¾ x 48 in. | 14 pairs |
| 4-compartment, white | $149.99 | 41⅜ x 8⅝ x 42⅛ in. | 8 pairs |
| 4-compartment, gray | $119.99 | Same as above | 8 pairs |
Verify current availability and pricing at IKEA's website before purchasing — stock levels can shift.
Still Want the Original Hemnes?
Check Facebook Marketplace, OfferUp, and Craigslist. Used units appear regularly, often at significant discounts, and buying secondhand keeps project costs low. If you're planning to paint, prioritize the black-brown finish over white.
When DIY Reaches Its Limits
An IKEA hack — even a well-executed one — has a ceiling. If you want entryway or mudroom storage that's truly sized to your space, matched to your home's existing finishes, and built to last without modification, custom cabinetry is the permanent answer.
Broadway Kitchens & Baths designs and installs custom mudroom cabinetry as a standalone service: built-in bench seating with storage, shoe cubbies, coat organization, and hallway built-ins.
Every project starts with a free design consultation at their Englewood, NJ showroom, where you can see cabinetry options from brands including UltraCraft, Plain & Fancy, and Wolf Classic Cabinets in person before committing to anything.
Frequently Asked Questions
Did IKEA discontinue the Hemnes shoe cabinet?
Yes. IKEA labeled the Hemnes shoe cabinet "last chance to buy" in early 2025, and it has been discontinued. The IKEA GULLABERG is the closest currently available alternative. Used Hemnes units still appear regularly on secondhand marketplaces like Facebook Marketplace and OfferUp.
What is the best paint to use on an IKEA Hemnes shoe cabinet?
Start with a shellac-based primer (Zinsser B-I-N is the most recommended) — it bonds to laminate and foil surfaces without extensive sanding. Follow with a satin or semi-gloss latex topcoat for durability. Skipping primer is the primary cause of peeling.
Can you join two IKEA Hemnes shoe cabinets together?
Yes. Drill through the inner side panels of each unit and bolt them together for a seamless double-wide cabinet that reads as a single built-in piece. It's intermediate DIY difficulty, so watch a step-by-step tutorial video before starting to get the measurements right.
How many shoes does the IKEA Hemnes shoe cabinet hold?
The 4-compartment Hemnes holds 8 pairs of shoes according to IKEA's official product listings. The 2-compartment version holds 14 pairs. Whether compartments are adjustable for boots is not confirmed by official IKEA documentation.
What is a good alternative to the IKEA Hemnes shoe cabinet?
The IKEA GULLABERG is the direct in-store replacement, available in 2- and 4-compartment versions starting at $119.99. Similar closed-door shoe cabinets are also available at Target and Wayfair in comparable size and price ranges — check current listings for availability.
Can the IKEA Hemnes shoe cabinet be used as a bench?
When two units are joined and topped with a solid wood board, MDF slab, or countertop surface, the combined piece functions well as a bench. Add a cushion or upholstered pad on top and it becomes a proper mudroom seat.