Many homeowners and even some contractors underestimate how technically demanding this process is. Granite rates 6–7 on the Mohs hardness scale — harder than marble, limestone, and most other natural stone materials — which is exactly why it requires dedicated diamond-blade saws, CNC equipment, and crews who know how to handle a material that will not forgive shortcuts.
This guide covers eight essential best practices, split between fabrication and installation, so you know what to expect and what to ask for.
Key Takeaways
- Digital templating captures measurements to the millimeter — manual templates introduce errors that compound at every step
- Use water-cooled diamond blade saws — dry cutting causes micro-fractures and rough edges that are impossible to fix after installation
- Steel rod reinforcement under sink cutouts prevents cracking under sustained load
- Cabinets must be fully level and structurally sound before granite arrives on-site
- Seal before first use, re-seal every 6–12 months, and avoid bleach-based cleaners
What Is Granite Countertop Fabrication?
Fabrication is the multi-step process of transforming a raw granite slab into a finished, custom-fit countertop surface — all work completed before the stone arrives on-site for installation. The core steps include:
- Templating the space for precise dimensions
- Cutting the slab to size
- Edge profiling
- Sink and appliance cutouts
- Polishing and sealing

The distinction between fabrication and installation matters. Fabrication happens in the workshop (or partly on-site during templating). Installation covers placement, leveling, securing, and seam finishing. Both stages require specialist skills. At Broadway Kitchens & Baths, both are handled under one coordinated process — from field measurements to final punch-list — which removes the handoff gaps that arise when fabrication and installation are sourced separately.
Granite's hardness makes it both durable and demanding to work with. The Natural Stone Institute notes that granite was historically avoided by smaller fabricating shops precisely because softer stones like marble were easier to cut and shape. Advances in affordable diamond-blade machinery changed that, but the equipment requirement remains. You cannot fabricate granite correctly without the right tools.
Tips 1–4: Fabrication Best Practices
Tip 1: Invest in Precise Digital Templating
Templating is the blueprint for the entire project. Any inaccuracy in mapping cabinet dimensions, wall angles, sink positions, or appliance cutouts will carry through every step that follows — and a gap caused by a bad template cannot be corrected after the stone is cut.
Digital laser templating captures measurements to the millimeter and feeds directly to CNC machines — eliminating the manual data entry errors that plague traditional cardboard or wood templates. Manual methods are slower and carry a meaningfully higher risk of costly remakes.
Before any stone is cut, confirm:
- Walls are checked for true 90-degree angles (most walls aren't)
- Countertop overhangs are measured and agreed upon
- Sink, faucet, and appliance positions are marked and verified
- The completed template is reviewed and approved in writing
Skipping this review is the single most avoidable cause of granite project rework.
Tip 2: Use the Right Cutting Tools for Granite
Granite's density requires water-cooled diamond blade saws or CNC waterjet cutting systems. Standard dry-cutting saws generate friction heat that causes micro-fractures in the stone, produces rough uneven edges, and accelerates blade wear. Wet cutting suppresses heat, extends blade life, and produces smoother edge finishes — it also controls silica dust, which is a serious respiratory hazard.
For complex layouts — L-shapes, islands, curved edges — CNC precision is required. Manual cutting of these shapes increases the risk of visible irregularities at seams and joints that cannot be corrected after the fact.
A fabricator who is not using water-cooled equipment is making a choice that will show up in the finished surface.
Tip 3: Reinforce Around Sink Cutouts and Thin Spans
The thin strips of granite in front of and behind the sink opening are structurally vulnerable. Under sustained load, vibration from garbage disposals, or the stress of installation itself, unreinforced spans can crack — sometimes weeks or months after the job is complete.
The professional standard, as recognized by the Natural Stone Institute, is rodding: routing shallow channels on the underside of the slab near the cutout, then bonding stainless steel rods with epoxy. Two approaches are common in the field:
- Stainless steel rods in epoxy — the correct method; resists corrosion and holds long-term
- Cold steel rods in polyester resin — a cheaper shortcut some fabricators use; adequate in the short term but inferior for durability
The reinforcement is hidden once installed. So is the absence of it — right up until the slab cracks.
Tip 4: Select Edge Profiles for Both Aesthetics and Function
Edge profiles are a design decision with real functional consequences. Choose before fabrication begins — changing a profile after cutting adds cost and time.
| Profile | Chipping Risk | Best For |
|---|---|---|
| Eased | Low | High-traffic kitchens, families with children |
| Bullnose | Low | Durable, forgiving to impacts |
| Ogee | Higher | Decorative applications, lower-traffic areas |
| Mitered | Higher | Contemporary design; requires precision fabrication |
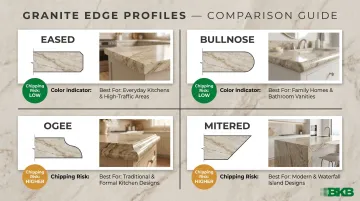
Broadway Kitchens & Baths notes that eased edges are the leading choice for transitional spaces, and that ogee profiles add depth and detail without being overly ornate. The guidance is consistent with what durability data shows: softer, rounder profiles resist chipping better in everyday use.
Edge profile also affects perceived countertop thickness and design cohesion with cabinetry — a consideration worth discussing with your designer before finalization.
Tips 5–8: Installation Best Practices
Tip 5: Prepare the Cabinet Base Before Granite Arrives
Granite cannot compensate for an uneven or weak support structure. Cabinets must be fully installed, level in both directions, and structurally ready before any stone arrives on-site.
Weight context: A 3cm granite slab weighs approximately 18–20 lbs per square foot. A standard kitchen countertop run can easily total 400–600 lbs. That load needs uniform, stable support.
For 2cm slabs, a plywood sub-top (typically 1/2-inch or 5/8-inch) is required to provide structural support and bring the surface to proper height. 3cm slabs install directly onto cabinet frames without a sub-top.
Before installation day, confirm:
- All cabinets are installed and level (front-to-back and side-to-side)
- Plumbing rough-in is complete
- Electrical and appliance rough-in is complete
- No cabinet modifications are pending
Arriving with an unprepared base is one of the most common causes of installation delays — and the added labor costs fall on whoever scheduled the work.
Tip 6: Plan Seam Placement Strategically
With the base confirmed, seam placement becomes the next critical decision. Seams are unavoidable in larger kitchens and complex layouts, but their location can and should be controlled. Poor placement is a leading cause of callbacks and structural failure.
Structural rules:
- Place seams directly over cabinet supports, never over unsupported spans like dishwasher openings
- Maintain a minimum 6-inch setback from inside corners (8–12 inches preferred)
- Never place a seam at an inside corner — these are crack-propagation points
Aesthetic rules:
- Align seams with natural veining or pattern breaks in the slab
- Run seams through the center of sink cutouts when possible to minimize visible joint length
- Edge chipping on the seam face must be under 1mm to remain inconspicuous
A finished seam should be imperceptible to the touch — achieved by grinding edges smooth, joining with color-matched epoxy, and clamping pieces flush. If you can feel a lip or ridge, the seam needs rework.

Tip 7: Apply Sealer Before First Use — and Re-Seal Annually
Once placement is locked in, sealing is the last line of defense against surface damage. Granite is a porous natural stone — per the Natural Stone Institute, absorption rates range from 0.05% to 0.40% by weight, which is low, but enough for oils, wine, citrus juice, and coffee to cause permanent staining without a sealer in place.
Sealing creates a barrier that gives you time to clean spills before absorption occurs. It does not make granite stain-proof; it makes it stain-resistant.
Sealing guidance:
- Apply before first use — always
- Re-seal every 6–12 months for kitchen countertops (every 6 months for heavy-use surfaces)
- Consider stone enhancer-sealer combination products, which simultaneously deepen the stone's natural color and provide protection
- Avoid acidic or abrasive cleaners — they strip sealers and leave the stone exposed
Tip 8: Validate Level, Fit, and Finish Before Sign-Off
Post-installation checks are frequently skipped — a mistake that surfaces months later as water damage, mold at the sink rim, or a seam that opens under thermal movement.
Before signing off on any granite countertop installation, verify:
- Use a precision level across multiple points on the surface
- Check overhangs for consistent depth on all exposed edges
- Run your hand across seams — no lip, ridge, or step should be detectable
- Confirm sink and appliance cutouts fit correctly and are secured
- Verify sealer has been applied
For professionals managing multi-unit or commercial projects, Broadway Kitchens & Baths builds this validation into a documented punch-list process, covering everything from field measurements through final sign-off. That documentation keeps projects on track and gives all parties a clear record when questions arise.
Common Mistakes to Avoid in Granite Fabrication and Installation
Three mistakes account for most granite project failures, delays, and injuries on job sites.
Skipping site-specific templating. Fabricators who cut from generic measurements rather than field templates frequently miss out-of-square walls and non-standard cabinet dimensions. The result: gaps, inconsistent overhangs, or a full re-fabrication. It's the most avoidable source of granite rework.
Mishandling slabs on-site. A 3cm granite slab weighs roughly 18–20 lbs per square foot — a full slab can exceed 500 lbs. OSHA's Safety and Health Information Bulletin requires written safe-handling procedures, A-frame storage, and mechanical lifting aids (slab dollies, suction lifters, scissor clamps) for stone transport.
Workers must never stand in the fall shadow of a slab. Skipping these protocols risks injury and damages the stone before it ever reaches the countertop.
Forgetting to schedule a plumber. Fabricators manage the stone — cutting, polishing, sealing, installation. Disconnecting and reconnecting sink plumbing requires a licensed plumber in most jurisdictions. Failing to book this trade before installation day is a recurring cause of delays on live kitchen renovations. Schedule the plumber at least a week ahead of the install date.
Conclusion
The quality of a granite countertop installation is determined by preparation, precision, and sequencing. Teams that invest in accurate digital templating, proper water-cooled cutting tools, structural reinforcement at sink cutouts, and methodical post-installation validation consistently produce surfaces that perform for decades.
For architects specifying materials on multi-unit projects, builders coordinating tight schedules, or homeowners planning a single kitchen renovation, working with a firm that manages fabrication and installation as one integrated process — rather than two separate handoffs — reduces callbacks, tightens tolerances, and keeps punch-lists short.
Broadway Kitchens & Baths handles granite countertop projects across the tri-state area end-to-end, from field measurements and material selection through final punch-list sign-off. Visit the Englewood, NJ or Manhattan showrooms to walk through your project scope with the team.
Frequently Asked Questions
How much does it cost to fabricate and install granite countertops?
Granite countertop projects typically run $40–$100 per square foot, with most kitchens totaling $2,000–$4,500 nationally. Add-ons — edge profiles, sink cutouts (~$100 each), tear-out ($4–$7/sq ft), and plumbing disconnect/reconnect ($350–$2,000) — are billed separately.
What does it mean to fabricate granite countertops?
Fabrication is the process of transforming a raw granite slab into a finished, installation-ready countertop — including templating, cutting to dimension, edge profiling, sink cutouts, polishing, and sealing.
Do fabricators install countertops?
Many fabricators offer installation services, but not all do. Working with a firm that handles both — like Broadway Kitchens & Baths — keeps accountability in one place and eliminates the gaps that arise when fabrication and installation are split between vendors.
Is granite out of style in 2026?
No. Granite held a 28.0% global market share in 2025 — the largest share of any countertop material segment. Its unique natural patterning, durability, and design versatility continue to make it a top choice in both residential and commercial applications.
How do you avoid seams in granite countertops?
Select a slab large enough to cover the full run, and design the layout to minimize the number of pieces required. Where seams are unavoidable, a skilled fabricator using digital templating and color-matched epoxy can make them nearly invisible.
Should you use Clorox wipes on granite?
No. Clorox wipes contain bleach and often citric acid — both strip the protective sealer and can etch the stone surface over time. Use mild dish soap and water, or a pH-neutral cleaner formulated specifically for natural stone.