The good news: most installation failures trace back to the same handful of skipped steps. Follow the right sequence from the start and butcher block will outlast nearly any other countertop material in your kitchen.
This guide covers 7 pro-level tips — from acclimation through final fastening — so you get the installation right the first time.
Key Takeaways
- Acclimate the block in the installation room for at least 72 hours before touching it
- Seal all six surfaces (including the underside) before installation
- Use screws with oversized pilot holes only — skip adhesives entirely
- Seal cut edges and sink cutouts immediately after cutting
- Leave an air gap between the block and any solid cabinet surface
What You'll Need Before You Start
Getting organized before the block arrives saves time and prevents costly mid-installation decisions.
Tools
- Circular saw with a straight-edge clamp guide
- Orbital sander with 120-grit sandpaper (80-grit for refinishing or removing defects)
- Drill and impact driver
- Tape measure and pencil
- Clamps
- Safety equipment: gloves, safety glasses, ear protection, dust mask
Materials
- Butcher block panel
- #10 pan-head screws with large fender washers
- Silicone sealant (for sink cutouts)
- Wood finish or sealant — all six faces of unfinished tops must be coated before installation
- 2x4s for elevated storage during acclimation
Sourcing matters more than most installers expect. Material that arrives at the wrong moisture content will move after installation, no matter how careful the fit. Broadway Kitchens & Baths supplies countertops with verified moisture specs, which eliminates a common variable before the project even begins.
7 Best Tips for Installing Butcher Block Countertops Like a Pro
The difference between a countertop that warps in year one and one that holds up for decades comes down to these seven steps. Shortcuts in any of them tend to compound.
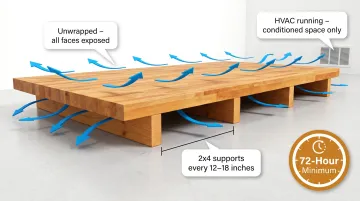
Tip 1: Acclimate the Wood Before You Do Anything Else
Wood is hygroscopic — it continuously absorbs and releases moisture from the surrounding air. Install a block that hasn't adjusted to your kitchen's humidity level, and it will move after installation. That movement shows up as cupping, cracking, or fasteners that suddenly feel loose.
Minimum acclimation window: 72 hours. John Boos, one of the most widely referenced manufacturers, mandates this as a baseline. Armani Fine Woodworking recommends approximately 5 days for custom hardwood slabs. During that window:
- Keep the block elevated on 2x4s spaced 12–18 inches apart
- Leave it unwrapped so both faces are exposed to air
- Make sure the HVAC system is running — acclimating in an unconditioned space doesn't reflect actual installation conditions
If the block arrives with slight warpage, don't panic. That's often a temporary moisture shift from transport. Lay it flat in the installation environment and most self-correct before you're ready to install.
The target moisture content for interior wood is 6–8%, per USDA Forest Products Laboratory standards. If you want to verify before installing, a pin or pinless moisture meter takes the guesswork out.
Tip 2: Measure and Cut with Precision — Then Seal Immediately
Set up cuts using a straight-edge guide clamped firmly to the block. Position the guide on the "keep" side of the cut line so any minor deviation doesn't damage the finished piece. Set your circular saw blade to extend approximately 1/4 inch below the countertop's bottom face, and apply masking tape over the cut line to prevent splintering.
The step most people skip: seal cut edges immediately after cutting. Every manufacturer guide reviewed — John Boos, Allen+Roth, Armani Fine Woodworking — requires re-applying finish to any area cut during installation. Exposed glue lines are highly vulnerable to moisture infiltration, and leaving them bare even briefly creates entry points for damage that's difficult to reverse.
Film-forming finishes like polyurethane provide a harder moisture barrier than penetrating oils, making them the better choice for cut edges.
Don't set the saw down and walk away. Seal those edges before moving to the next step.
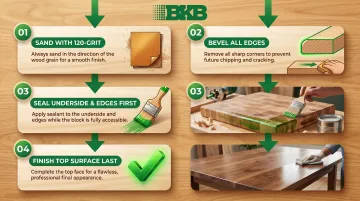
Tip 3: Sand and Seal All Six Surfaces Before Installing
Allen+Roth's installation instructions are explicit: "All surfaces of the countertop must be finished. This includes top, bottom, edges and ends." Armani Fine Woodworking warns that unfinished pieces risk warping and glue joint separation from the moment they're exposed to ambient air.
Why the underside matters so much: uneven moisture absorption between the top and bottom face is the primary cause of warping. If the top is sealed and the bottom isn't, moisture enters from below at a different rate than it leaves from above — the wood bends toward the drier face. Sealing all six faces equalizes the moisture barrier.
For new installations, follow this sequence:
- Sand with 120-grit in the direction of the grain
- Apply a light bevel on all edges to eliminate sharp corners
- Finish the underside and edges first while the block is accessible on all sides
- Address the top surface last
Tip 4: Never Use Adhesives — Fasten with Screws and Oversized Holes
This one has no exceptions. John Boos, Allen+Roth, and Armani Fine Woodworking all explicitly prohibit construction adhesive, epoxy, and silicone caulk for mounting butcher block. The reason: adhesives lock the wood in place and prevent the natural seasonal expansion and contraction that wood requires. The wood moves anyway — and when it can't, it cracks, delaminates, or damages the cabinet frame.
The correct fastening method:
- Drill pilot holes through corner blocks or blocking strips inside the cabinet
- Drill corresponding oversized holes in the sub-top — approximately 3/8" diameter for a #10 screw (about 1/8" larger than the screw thread)
- Secure with fender washers and #10 pan-head screws, tightened only until snug
That oversized hole is what gives the wood room to move seasonally. A 25-inch maple countertop can expand and contract more than 1/3 inch with normal humidity fluctuations — the fastener system has to accommodate that.
Don't over-tighten. John Boos specifically warns that cracking occurs when screws are driven too tightly and prevent free movement. Snug is the target — not cinched down.
Tip 5: Allow for Air Circulation and Seasonal Movement
Mounting butcher block directly onto a solid cabinet top — plywood dust cover, MDF, or existing laminate — restricts airflow to the underside. That creates uneven moisture conditions between the top and bottom faces, which leads to stress, cracking, and delamination over time.
If your cabinets have solid-topped bases:
- Drill 1/4" ventilation holes every 6–9 inches through the solid underlayment (per Allen+Roth's instructions), or
- Install furring strips to create a consistent air gap across the full base
Expansion clearances at fixed surfaces:
For expansion at walls and fixed surfaces: leave a 1/8" gap at each end when the countertop runs between two walls. Around cooktops and sink cutouts, leave 1/4" clearance all around. These aren't suggestions — they're the manufacturer-recommended clearances that prevent buckling when the wood expands in humid months.

Tip 6: Seal Sink Cutouts and Heat Appliance Areas Properly
Any cutout creates exposed end grain and glue lines — and those are the most vulnerable points on the entire countertop. They need specific treatment immediately after cutting.
For undermount sinks:
- Seal all cut edges with finish immediately after cutting
- Apply a continuous bead of flexible silicone sealant around the full perimeter where the sink rim meets the underside of the block
- This creates a waterproof barrier that prevents moisture infiltration and mold buildup at one of the highest-risk points in a kitchen
For cooktop cutouts:
- Seal cut edges first
- Apply self-adhering aluminum flashing (per Allen+Roth) or heat-insulating tape to the cut edges to dissipate heat into the cabinet below
- John Boos specifically requires heat insulation around all cooktop installations to reduce long-term heat stress on the wood
Skip this prep on either cutout and you're leaving the two highest-moisture, highest-heat points in the kitchen completely unprotected.
Tip 7: Support Overhangs and Check Level Before Final Fastening
Per John Boos overhang installation documentation:
- Overhangs 8 inches or more (perpendicular to grain) require bracket support
- Overhangs 12 inches or more (with the grain) require bracket support
- Brackets must be placed a maximum of 24 inches apart
Allen+Roth confirms the same 8-inch threshold. Unsupported overhangs sag over time and create structural stress that propagates back into the countertop surface.
Before tightening any fasteners, verify the block is level across its full length and that the front edge aligns flush with the cabinet face. Once screws are set, making corrections requires loosening everything and starting over — take the extra few minutes to get positioning right first.
Common Installation Mistakes and How to Fix Them
Even careful installers run into problems. Here are the three most common butcher block mistakes and how to correct them.
| Mistake | Likely Cause | Fix |
|---|---|---|
| Warping after installation | Block not acclimated; no air gap below | Loosen screws, acclimate fully, re-mount with furring strips or washer spacers |
| Split ends / cracking along glue lines | Cut edges not sealed; screws over-tightened | Fill with wood filler, sand, and seal; re-drill oversized pilot holes before re-fastening |
| Block shifting or sitting uneven | Too few fastening points; inaccurate pilot holes | Add fasteners at all four corners and every 24 inches; check level before final tightening |
Conclusion
Butcher block rewards careful installation in a way that stone countertops don't — get the prep right and the material will perform for decades. Skip the acclimation window, leave a face unsealed, or reach for the construction adhesive, and you'll be dealing with problems that are expensive and time-consuming to reverse.
For straightforward installations with a single run of countertop, these seven steps give you a reliable framework. For full kitchen renovations, corner miters, multiple joined sections, or any layout where measurement precision is critical, working with an experienced kitchen and bath specialist keeps costly mistakes off the table. Broadway Kitchens & Baths handles field measurements, material coordination, and installation end to end. Their team works with both homeowners and contractors throughout the NJ and NYC metro area. Reach their Englewood showroom at (201) 567-9585.
Frequently Asked Questions
What is the average cost to install a butcher block countertop?
According to HomeAdvisor and Angi, professionally installed butcher block typically runs $1,200–$5,000, with material costs ranging from $15–$50/sq ft for red oak up to $75–$350/sq ft for walnut. DIY installation (tools and materials only) runs $100–$500.
What is the "Rule of 7" for butcher block?
The Rule of 7 is an oil maintenance schedule, not an installation standard. It refers to conditioning a new butcher block with oil: once a day for 7 days, once a week for 7 weeks, then once a month for 7 months.
Can you install butcher block countertops yourself, or do you need a professional?
Butcher block is one of the more DIY-accessible countertop materials for straightforward runs. Complex layouts — corner miters, multiple joined sections, or cutouts near plumbing — benefit significantly from professional installation.
Do butcher block countertops need to be sealed before installation?
Yes — all six surfaces, including the underside, should be sealed before installation. Leaving any face bare creates uneven moisture absorption between surfaces, which is the leading cause of post-installation warping.
How do you cut butcher block countertops to fit?
Use a circular saw with a straight-edge guide clamped to the block. Set the blade to extend 1/4 inch below the bottom face, apply masking tape over the cut line to prevent splintering, and seal all cut edges immediately with finish before proceeding.
How do you prevent butcher block from warping after installation?
Three things matter most: acclimate for at least 72 hours in the installation room, seal all six faces (especially the underside) before mounting, and fasten with oversized pilot holes and fender washers so the wood can move seasonally without restriction.