This guide covers the complete process: assessing the frame before you order anything, sizing and prepping the door, cutting clean mortises, hanging the slab, and validating the result before you call it done. Whether you're a homeowner replacing a tired interior door or a contractor handling a single replacement during a broader renovation, the sequence is the same.
Key Takeaways
- Check the existing frame for plumb and square before buying a slab; a compromised frame will ruin the fit.
- Per JELD-WEN's installation specifications, maximum allowable deviation is 1/4" out of square and 1/8" out of plumb.
- Hinge mortise depth is critical: a proud hinge binds the door, while one cut too deep creates a gap.
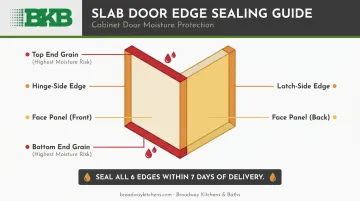
- Seal all six edges of a raw wood slab before hanging, including the top and bottom end grain.
- Target clearances: 1/8" at the head and latch side, 1/16" at the hinge side, and 3/4"–1" at the floor.
Before You Start: Frame Assessment and Prerequisites
The most common slab door mistake happens before anyone picks up a chisel: ordering the door without first verifying the existing frame can accept it. This section covers the three checks — plumb and square, stop conditions, and reference measurements — that determine whether you're ready to proceed.
Check Plumb and Square First
Use a 4-foot level on both vertical jambs. Then measure the diagonals of the frame opening — if they match, the frame is square. If they don't, you have a problem that no amount of careful mortise work will fix.
JELD-WEN's Interior Door Slab installation instructions publish clear thresholds:
- Maximum out-of-square: 1/4 inch
- Maximum out-of-plumb or twist: 1/8 inch
- Minimum jamb clearance: the existing jamb should be at least 3/16" wider than the slab and 3/8" taller
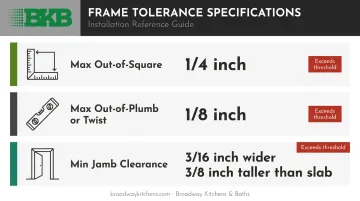
Frames outside these limits need corrective work before the door goes in. Hanging a precision-cut slab into a racked frame does not fix the frame. It transfers the problem to the door.
Conditions That Should Stop the Job
- Visible rot, cracked jambs, or loose hinge mortises in the existing frame
- Frame deviation beyond the published tolerances above
- Wall movement or structural shifts affecting the opening geometry
Once the frame clears these checks, gather the measurements that will guide your door order.
Capture Measurements from the Old Door or Frame
If the old door is still in place, use it as your primary reference. Measure:
- Overall height and width
- Door thickness (typically 1-3/8" for standard interior doors)
- Hinge size, position from top and bottom, and corner radius
- Lockset centerline height and backset distance
Only measure from the frame opening if the old door is unavailable or was itself cut incorrectly.
Tools and Materials
Before you start fitting and hanging, gather everything on this list. Missing a single item mid-job — especially the right hole saw — will cost you a trip back to the supplier.
Tools
- Tape measure, pencil, speed square
- 4-foot level
- Sharp wood chisel and hammer — a dull chisel tears grain, so sharpen before you start
- Utility knife
- Power drill with bits
- 2-1/8" hole saw (lock bore) and 1" spade bit (latch bore)
- Hand saw or circular saw (if trimming is needed)
- Clamps
Materials
- Slab door sized to the opening (with correct clearances)
- Hinges — 3 for doors up to 84" tall, 4 for taller slabs; 3-1/2" hinges for doors up to 32" wide, 4" hinges for 32"–36" wide doors (per National Hardware sizing guidance)
- Lockset and strike plate hardware
- Wood filler or shimming material if correcting existing mortises
How to Install a Slab Door: Step-by-Step
A careful DIYer can complete this in 2–4 hours. Contractors working a known frame move faster, but precision determines whether the door actually functions — so don't rush the layout steps.
Step 1 — Size the Door
Measure the frame opening height and width independently. Allow:
- 1/8" clearance at the top and latch side
- 1/16" at the hinge side
- 3/4"–1" at the floor over hardwood
Never assume a purchased slab drops straight in without checking. If the door is slightly oversized, trim the appropriate edge with a circular saw or hand saw. Always trim from the latch side if width is the issue, never the hinge side.
Step 2 — Transfer Hinge and Hardware Locations
Lay the new slab next to the old door (or reference the existing frame directly). Use a speed square to transfer:
- Hinge positions, measured from both the top and bottom of the door
- Lockset centerline — JELD-WEN notes this is typically 44" from the top of the slab
- Standard backsets are 2-3/8" or 2-3/4" depending on the lockset
Measure twice. Layout errors at this stage compound through every step that follows.
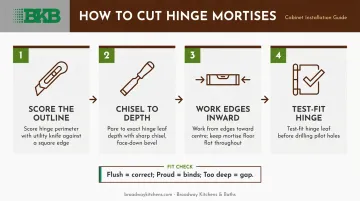
Step 3 — Cut Hinge Mortises
- Score the hinge outline with a utility knife to prevent tear-out
- Chisel out material to a depth exactly matching the hinge leaf thickness
- Work from the edges inward, keeping the mortise flat and even
- Test-fit each hinge before drilling pilot holes
The mortise must be flush — a hinge sitting proud binds the door against the jamb; one too deep creates a gap on the latch side. As Fine Homebuilding identifies, door binding at the latch jamb with a gap on the hinge side is almost always caused by mortises that aren't deep enough.
Step 4 — Drill Lock and Latch Bores
- Lock bore: 2-1/8" hole saw through the face of the door
- Latch bore: 1" spade bit through the door edge
- Confirm the latch bore aligns with the existing strike plate mortise on the jamb before hanging the door
Use the lockset manufacturer's template if one is included — it eliminates layout guesswork.
Step 5 — Hang the Door
Screw the hinges to the door slab first, then lift the door into the frame with a helper. Align the door-side hinges with the frame-side mortises and insert the hinge pins from top to bottom.
For solid-core or heavier slabs, JELD-WEN recommends using 1"–2-1/2" screws through the top two hinges to reach the framing — not just the jamb.
Test the swing immediately. The door should open and close without dragging or binding.
Post-Installation Checks
Don't skip this phase. A door that almost works at installation will bind, stick, or wear out hardware within a few months.
Clearance check: Verify 1/8" at the head and latch side, 1/16" at the hinge side, and adequate floor clearance. Uneven gaps across the height of the door indicate re-hanging or frame shimming is needed.
Latch test: The latch should engage the strike plate with a single push and hold without rattling. Family Handyman's guidance suggests a practical diagnostic: put lipstick on the latch bolt, press the door closed against masking tape on the strike plate, and the contact mark shows exactly where alignment is off.
Swing test: Leave the door at 45 degrees and let go. It should stay where it is — neither swinging open nor drifting closed. If it moves on its own, the frame is out of plumb and the hinges will need to be repositioned or shims adjusted before the door is considered complete.
Common Installation Problems and Fixes
Most slab door problems trace back to preparation, not the hanging itself.
Door Binds or Sticks When Closing
The usual culprits are shallow hinge mortises (hinges sitting proud of the jamb), a door that's marginally oversized, or a frame that's out of plumb.
Check frame plumb first. If the frame is plumb, deepen the mortises in small increments and test between passes. If the door is slightly oversized, plane or sand the latch-side edge — never remove material from the hinge side.
Uneven Gaps Around the Door
This typically means the frame is out of square or the door wasn't sized to the true opening dimensions.
Small gaps can often be corrected by adjusting hinge depth. If the frame is significantly out of square, the slab may need to be scribed and trimmed to match the actual opening — or the frame needs corrective work first.
Latch Does Not Catch the Strike Plate
Cause: The lockset bore didn't align precisely with the existing strike plate, or the door is hanging at a slightly different height than the original.
Fix: Per Family Handyman, if the latch misses by 1/8" or less, enlarge the strike plate hole with a file. If misalignment is greater than 1/8", reposition the strike plate — enlarge the mortise and drill new pilot holes. Tightening hinge screws (or replacing them with longer screws) can also shift latch height slightly.
Pro Tips for a Better Result
Use the old door as your template. It's the most reliable reference for what fits the frame. Only measure directly from the frame opening if the old door was itself cut incorrectly or is no longer available.
Seal all six edges before hanging. JELD-WEN requires this to maintain warranty; Masonite specifies finishing all six edges within 7 days of delivery. The end grain at the top and bottom absorbs moisture fastest, causing swelling and warping over time. This step is consistently skipped — and it's a leading cause of premature door failure.
Acclimate the door first. JELD-WEN requires at least 24 hours of acclimation in the installation environment; TruStile requires 72 hours for wood doors. Store the slab flat, off the floor, in conditions between 30%–50% relative humidity.
Know when to stop and call someone. If the frame deviates more than 1/4" from square or 1/8" from plumb, if the jamb is damaged, or if the wall shows signs of structural movement — stop. Hanging a precision-fit door into a compromised frame guarantees failure.
When a door replacement is part of a broader kitchen or bathroom renovation, coordination across trades matters. Broadway Kitchens & Baths manages full renovations from cabinetry selection through final installation, helping ensure door hardware finishes, trim profiles, and overall design align with the rest of the project before anything is cut or hung.
Frequently Asked Questions
What is a slab door?
A slab door is the door panel on its own, with no frame, hinges, or hardware pre-attached. The installer mounts it into an existing or newly built frame, making it a flexible and typically lower-cost option compared to a pre-hung unit.
Can I install a slab door without replacing the frame?
Yes, and that's the most common use case. It works well when the existing frame is plumb, square, and undamaged, and the new slab matches the original door's dimensions and hinge configuration.
How do I know what size slab door to buy?
Measure the existing door (height, width, thickness), not just the rough opening. Allow for standard clearances, and always verify the frame opening independently — older homes sometimes have doors that were cut down and won't reflect the true frame dimensions.
Do I need new hinges when replacing a slab door?
Not necessarily. If the existing hinges are in good condition and the correct size, they can be reused. Before cutting new mortises on the slab, confirm the hinge leaf dimensions, corner radius, and mortise fit all match.
How much gap should there be around an installed slab door?
Per JELD-WEN's specifications: 1/8" at the head and latch-side jamb, 1/16" at the hinge-side jamb, and 3/4"–1" at the floor for adequate airflow and clearance without dragging.
When should I hire a professional instead of doing this myself?
Call a professional when:
- The existing frame is out of plumb or structurally damaged
- The door is a heavy solid-core slab that requires precise trimming
- The project spans multiple doors where consistent results and finishes are critical