Get it wrong and you're looking at rework, a cabinet that won't hang straight, or damage that's expensive to fix.
This guide covers the five tips that experienced installers rely on to get recessed medicine cabinets right the first time — from your initial wall inspection through the final caulk bead.
Key Takeaways
- Inspect the wall cavity before buying anything; obstructions (pipes, wires, blocking) can force a different cabinet size or location
- Build a full four-sided blocking frame, not just two flanking studs
- Position the top of the cabinet box at roughly 72 inches from the floor, then adjust so the mirror reflects your face
- Check level and plumb when marking, during the dry-fit, and again before the final screws
- Seal the perimeter with paintable caulk to block moisture from getting behind the cabinet
Before You Start: Inspect Your Wall and Plan Placement
Cutting the opening before you understand what's inside the wall is the single most common reason these projects go wrong — or get abandoned halfway through.
How to Inspect the Cavity
Start with a stud finder to locate studs within the area you're considering. Then cut small 4-inch inspection holes on either side of any studs you find. Use a flashlight to look inside for:
- Electrical wiring
- Plumbing supply lines
- Vent or drain pipes
- Any unexpected structural blocking
Keep your keyhole saw at a shallow angle when making inspection cuts — you don't want to nick anything before you know what's there.
What You Might Find (and What It Means)
Most wall studs sit on 16-inch centers, but many medicine cabinets exceed 18 inches wide. That means at least one stud will likely fall within your opening and need to be cut.
Cutting a stud in a load-bearing wall requires a structural header, and local building codes dictate header sizing. Per IRC R602.7.3, load-bearing headers are not required in nonbearing walls — a flat 2x4 handles openings up to 8 feet when conditions are met.
Confirm which type of wall you're working with before you touch a saw. That one step determines whether you need a licensed contractor involved before framing begins.
If your inspection reveals:
- Electrical wiring that needs rerouting → Stop. A licensed electrician handles this first.
- Plumbing or large vent pipes → A plumber must assess whether rerouting is feasible.
- Load-bearing framing → A structural header is required per code, and a surface-mounted cabinet may be the smarter choice.
For bathrooms wrapped into a larger renovation — or when the wall situation is more complex than the inspection reveals — a full-service remodeler like Broadway Kitchens & Baths can coordinate the structural, plumbing, and electrical scope under one project plan rather than juggling separate trades.
Height Planning
The standard guidance: position the top of the cabinet box (not the door trim) at 72 inches from the finished floor. Then adjust so the mirror reflects your face and upper body while clearing the sink, faucets, and any fixtures below. Confirm the sightline by standing at the sink — measure first, then verify with your eyes.
Tools and Materials You'll Need
Standard tools cover everything here — but every item on this list earns its place.
Tools:
- Stud finder
- Keyhole saw and handsaw or oscillating multi-tool
- Drill/driver
- Level and measuring tape
- Pencil, utility knife, rasp
- Flashlight and safety glasses
- Carpenter's square and caulk gun
Materials:
- 2x4 lumber for top and bottom blocking (cut to fit)
- Construction adhesive
- 2½-inch decking screws (blocking to studs)
- 1½-inch drywall screws (cut drywall edges to blocking)
- Siliconized acrylic caulk — paintable, moisture-resistant, and more durable than plain latex in bathroom conditions
Skip the drywall anchors — they're not a structural substitute for proper blocking. That distinction matters more than it sounds, and the next section explains why.
The 5 Best Tips for Installing a Recessed Medicine Cabinet the Right Way
Tip 1: Inspect the Cavity Before You Buy — Not After
This inspection should happen before you purchase a cabinet, not after. Cabinet dimensions vary widely, and what's inside your wall determines the maximum usable width.
Buying a 24-inch cabinet only to discover the usable cavity is 20 inches wastes money and time. The inspection tells you:
- Maximum available width based on stud layout and any obstructions
- Whether the wall is load-bearing (which affects header requirements)
- Whether rerouting is needed before any cuts are made
A "clear" cavity means the center zone is free of plumbing supply lines, large vent pipes, and load-bearing framing. Electrical wires and non-load-bearing studs can generally be addressed, but a qualified tradesperson must confirm before you proceed.
Tip 2: Build a Full Four-Sided Blocking Frame
This is the most structurally critical step, and the one most DIYers skip.
Many people screw the cabinet directly into the two flanking studs and call it done. The problem: that leaves the top and bottom edges of the cabinet with no solid backing. Over time, with the weight of full shelves, those edges flex and the screws work loose.
Why the weight matters: A standard Kohler 20x26 recessed unit weighs around 25 lbs empty. Larger premium models like a Robern 23x36 can exceed 50 lbs before you add a single bottle. Add the dynamic load of daily use and you need solid anchorage on all four sides.
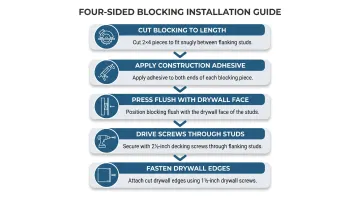
How to install the blocking:
- Cut 2x4 pieces to fit horizontally between the flanking studs at the top and bottom of the opening
- Apply construction adhesive to both ends of each blocking piece
- Press the blocking flush with the drywall face
- Drive 2½-inch decking screws through the flanking studs into the blocking
- Use 1½-inch drywall screws to re-secure any cut drywall edges to the blocking
This adds about 20 minutes — and means you won't be re-shimming or chasing loose screws a year later.
Tip 3: Use a Back-Cut When Sawing Through the Stud
When making the final handsaw cuts to remove a stud at the top and bottom of the opening, angle the blade very slightly so the cut goes behind the stud rather than straight through. This is called a back-cut.
The result is a tighter cabinet fit with no risk of gouging the drywall on the back wall of the cavity.
Practical note: If the kerf doesn't go all the way through, finish with a chisel or utility knife rather than forcing the saw. Forcing the blade can crack surrounding drywall or pull the opening out of square — problems that are far harder to fix once the blocking is in place.
Tip 4: Check Level and Plumb at Every Stage
Leveling is a process, not a final step you perform before tightening the last screw.
Check at three points:
- When marking the outline — before you cut anything
- During the dry-fit — after the opening is cut, before permanent attachment
- Before driving the final screws — when the cabinet is seated in the blocking
A cabinet installed even slightly off-plumb will have a door that swings open on its own or refuses to stay latched. During the dry-fit, use a rasp and utility knife to shave tight spots in the opening rather than forcing the cabinet in. A snug, square fit is the goal — not a forced one.
If the opening needs adjustment, fix it before the blocking is permanently screwed into place.
Tip 5: Finish the Perimeter with Caulk
A bathroom is a wet environment. Steam, humidity, and splashing water will find any gap between the cabinet's face frame and the surrounding wall. Without a caulk seal, moisture migrates behind the cabinet and softens the drywall. According to the EPA, mold can begin growing on damp materials within 24 to 48 hours — meaning an unsealed gap isn't just cosmetic, it's a mold risk.
Once the cabinet is screwed in:
- Apply a thin, even bead of siliconized acrylic caulk around the full perimeter
- Smooth the bead with a wet fingertip or caulk tool
- Let it cure before exposing to moisture
Caulk also conceals small irregularities in the cut line and closes any gaps between the cabinet lip and the wall finish, giving the installation that clean, built-in look.
Common Installation Mistakes (and How to Avoid Them)
Even careful installers run into these three problems. Knowing where the process typically breaks down makes it easy to sidestep each one.
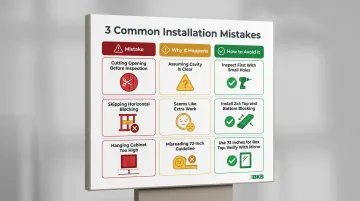
| Mistake | Why It Happens | How to Avoid It |
|---|---|---|
| Cutting the opening before inspecting the cavity | Assuming the wall cavity is clear | Cut inspection holes first; never commit to the full opening until the cavity is confirmed clear |
| Skipping horizontal blocking | Seems like extra work | Install 2x4 blocking at top and bottom — it takes 20 minutes and makes the cabinet permanent |
| Hanging the cabinet too high | Defaulting to 72 inches for the door top, not the box top | Use 72 inches as the starting point for the cabinet box, then adjust so the mirror reflects your face |
Frequently Asked Questions
Frequently Asked Questions
How are recessed medicine cabinets installed?
Start by inspecting the wall cavity, then mark and cut the opening. If a stud falls within the opening, cut it and install 2x4 blocking on all four sides. Slide the cabinet in, fasten it to the blocking, caulk the perimeter, and reassemble the door and shelves.
How high should a recessed medicine cabinet be from the floor?
The standard guideline places the top of the cabinet box at 72 inches from the finished floor. Adjust based on your height — the mirror should reflect your face and upper body comfortably while clearing the sink and any fixtures mounted below.
Should a medicine cabinet be recessed or surface-mounted?
Recessed cabinets sit flush with the wall for a cleaner look, but require cutting into the wall and framing a proper opening. Surface-mounted cabinets are easier to install and are the better choice when load-bearing walls, large vent pipes, or utility obstructions make cutting impractical.
How much does it cost to install a recessed medicine cabinet?
According to Homewyse's 2026 national data, total installation costs (cabinet plus basic labor and supplies) typically run $339 to $841. Costs rise significantly when electrical or plumbing needs to be rerouted — outlet relocation alone can add $130 to $300 per outlet.
Can a recessed medicine cabinet be installed in any wall?
No. Load-bearing walls require a structural header sized to local code. Walls with large vent pipes or utilities that can't be rerouted may rule out a recessed installation entirely. In those cases, a surface-mounted cabinet is the practical and code-compliant alternative.