Porcelain is a top choice for kitchen floors, and for good reason. But its performance depends entirely on how it's installed. A poorly executed porcelain floor will crack, shift, or develop hollow spots within a year. A properly installed one can last generations.
This guide covers 7 proven techniques — from subfloor prep to final sealing — that separate a floor that lasts decades from one that fails prematurely.
Key Takeaways
- Porcelain tile is defined by a water absorption rate of 0.5% or less (per ANSI A137.1) — making it one of the most moisture-resistant flooring options for kitchens
- Subfloor flatness is non-negotiable: max 1/4" deviation in 10 feet for standard tiles, 1/8" in 10 feet for large-format tiles
- Plan your layout first — snap chalk lines to find the visual center, dry-lay tiles, and adjust the starting point so no border cut falls narrower than half a tile
- Back-butter large-format tiles and use a leveling system to keep lippage in check
- Seal grout joints (not the tile itself) after 72 hours of curing to protect against kitchen stains
Why Porcelain Tiles Are Ideal for Kitchen Floors
Porcelain and ceramic tile are both fired clay products, but porcelain is fired at higher temperatures, producing a denser body with a water absorption rate of 0.5% or less per ANSI A137.1. Standard ceramic tile absorbs 3% to 7% of moisture — a meaningful difference in a kitchen where spills are daily events.
On the Mohs hardness scale, porcelain typically registers 7–8 compared to ceramic's 5–6, making it more resistant to scratches from dropped utensils and chair legs. The TCNA notes that porcelain is "often harder than granite."
That durability carries through to lifespan. The NAHB Study of Life Expectancy of Home Components lists ceramic tile flooring at 75–100 years — and porcelain, as a denser subset of ceramic, is expected to meet or exceed that benchmark.
Those performance advantages come with real installation demands. Porcelain is heavier, harder to cut, and less forgiving than ceramic or vinyl — which is precisely why proper technique is critical when working with it.
The 7 Best Techniques for Tiling a Kitchen Floor with Porcelain Tiles
Porcelain tile installations fail at the substrate, the layout, or the mortar bed — rarely at the tile itself. These seven techniques address every stage where errors compound.
Technique 1: Prepare the Subfloor Thoroughly
Porcelain tiles are rigid. Any flex, unevenness, or moisture problem in the substrate will telegraph directly through the tiles over time, causing grout failure and cracking.
Key subfloor prep steps:
- Check for soft spots and squeaks — repair or reinforce before anything else
- Check flatness with a long straightedge — per ANSI A108.02, the maximum allowable deviation is 1/4" in 10 feet for tiles under 15"; tighter tolerances improve outcomes
- Apply self-leveling compound to any dips or high spots that exceed this tolerance
- Install an appropriate underlayment over wood subfloors before setting tile
For wood subfloors, two underlayment options are standard:
- Cement backer board (e.g., Durock, HardieBacker): adds height to the floor assembly, requires a two-layer subfloor system, and provides a rigid substrate
- Uncoupling membrane (e.g., Schluter DITRA): a 1/8" polyethylene membrane that neutralizes differential movement between substrate and tile — the primary cause of cracking and delamination. DITRA also provides waterproofing and can be installed over a single layer of 3/4" exterior-grade plywood
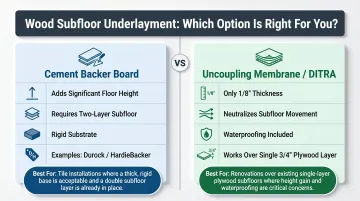
For kitchen renovations where floor height is a concern or moisture management is a priority, DITRA is increasingly the preferred option.
Technique 2: Plan Your Layout Before Setting a Single Tile
Layout planning determines whether the finished floor looks intentional or has awkward sliver cuts at the most visible edges of the room.
Finding the visual center:
Snap chalk lines between the midpoints of opposite walls. Where the two lines cross is your room's visual center — this is your reference point for the entire layout.
Confirming square with the 3-4-5 rule:
- Measure 3 feet along one chalk line from the center point
- Measure 4 feet along the perpendicular chalk line
- The diagonal between those two endpoints should measure exactly 5 feet
If it does, the angle is a true 90 degrees. This is a practical application of the Pythagorean theorem used throughout the tile trade.
Before committing to adhesive, do a dry lay across the planned layout. If border cuts at any visible edge come out narrower than half a tile width, shift your starting position. A few inches of adjustment at the center prevents awkward cuts at the perimeter.
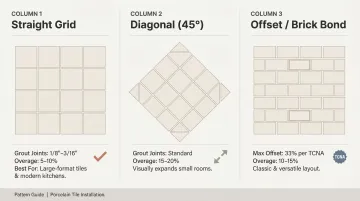
Technique 3: Straight Lay vs. Diagonal and Offset Patterns
Straight lay (grid) is the most common pattern for porcelain — tiles aligned in a uniform grid parallel to the walls. It works especially well with large-format tiles and clean, modern kitchen aesthetics. Maintain consistent grout joint spacing of 1/8" to 3/16" using tile spacers or a laser level throughout.
Diagonal layouts (tiles set at 45 degrees) can make a small kitchen appear larger, but they require significantly more cuts. Plan for 15–20% material overage for diagonal patterns versus 5–10% for straight layouts. Some complex diagonal installations require up to 25–30% overage.
Brick bond and herringbone patterns suit elongated or rectangular porcelain tiles. One important note: TCNA recommends a maximum 33% offset (rather than the standard 50% brick joint) for rectangular tiles to minimize lippage caused by natural tile warpage. Herringbone is the most cut-intensive pattern — it requires precise angles and careful alignment checks at every course.
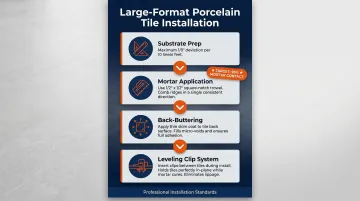
Technique 4: Install Large-Format Porcelain Tiles Correctly
Any tile with at least one edge 15" or longer is considered large-format, and the installation requirements tighten considerably.
Per ANSI A108.02, large-format tiles require a maximum substrate flatness deviation of 1/8" in 10 feet — half the tolerance allowed for standard tiles. Address this before any mortar work begins.
Mortar requirements for large-format tiles:
- Use a medium-bed mortar (meeting ANSI A118.4, A118.15, or A118.11) when embedded mortar thickness exceeds 3/16"
- Use a larger notched trowel — typically a 1/2" x 1/2" square-notch
- Achieve minimum 95% mortar contact for high-traffic kitchen floors (80% is the minimum for dry interior applications, but kitchen floors qualify for the higher threshold)
- Periodically pull a set tile during installation to verify actual coverage
Prevent lippage with a leveling clip system:
Large-format tiles amplify the effect of any substrate irregularity. A mechanical tile leveling system holds adjacent tiles in the same plane while mortar cures, preventing the uneven tile edges (lippage) that are both unsightly and a tripping hazard.
Technique 5: Thin-Set Application and Back-Buttering
Applying thin-set to the floor:
- Use the appropriate notched trowel for your tile size
- Work in manageable sections — only as much floor as you can tile before the mortar skins over (standard open time is roughly 20–50 minutes at 70°F, depending on the product)
- Comb mortar ridges in one consistent direction — this lets air escape as the tile is pressed down, improving contact
- If the mortar surface doesn't transfer to your fingertip when you touch it, it has skinned over and must be scraped off and re-applied
Back-buttering:
Apply a thin skim coat of thin-set to the back of each tile before pressing it into the mortar bed. This is especially important for:
- Large-format tiles (any edge 15" or longer)
- Rectified porcelain tiles (precisely cut edges with tighter tolerances)
- Any application where full mortar contact is critical
Back-buttering fills surface irregularities on the tile back and directly reduces the risk of hollow spots that cause cracking under load.
Technique 6: Grouting, Sealing, and Finishing
The grouting process:
- Wait a minimum of 24 hours after setting tile before grouting — cold or humid conditions may require longer
- Mix grout to a smooth, lump-free consistency
- Apply with a rubber float held at a 45-degree angle to the tile surface, working in small sections
- Clean grout haze with a damp sponge before it hardens — dried haze on polished porcelain is difficult to remove without scratching
Sealing: grout yes, tile no:
Porcelain tile itself does not require sealing — its sub-0.5% water absorption rate makes it effectively impervious. The grout joints are a different story.
Apply a penetrating grout sealer after grout has cured for a minimum of 48–72 hours. An unsealed grout joint in a kitchen will absorb staining quickly.
Re-seal every 1–2 years to keep joints protected long-term.
Common Tiling Mistakes to Avoid
Even experienced DIYers run into these — and they're worth knowing before you start:
- Skipping subfloor prep: No amount of good tile or adhesive compensates for a substrate that flexes or has moisture issues underneath
- Using the wrong thin-set: Standard thin-set is not appropriate for all tile types or substrates — large-format porcelain and heated floors have specific mortar requirements
- Grouting too soon: Setting tile and grouting the same day is one of the fastest ways to compromise the bond
- Omitting expansion gaps: Porcelain expands and contracts with temperature. Skipping perimeter and field movement joints causes "tenting," where tiles lift and buckle.
- Laying tile on a structurally compromised subfloor: A sagging or bouncy subfloor will eventually crack even the best-installed porcelain
TCNA Detail EJ171 Note: Perimeter movement joints must be a minimum 1/4" wide at all walls and restraining surfaces, filled with flexible sealant (silicone or urethane), not rigid grout. Field movement joints are required every 20–25 feet in each direction for interior installations.
Kitchens with irregular footprints, in-floor heating systems, or structural subfloor issues are where professional installation pays for itself. Broadway Kitchens & Baths specializes in exactly these scenarios — complex tile layouts, multiple floor transitions, and full kitchen renovations across the NYC metro area.
Frequently Asked Questions
When tiling a kitchen floor, where do you start?
Start at the visual center of the room, found by snapping chalk lines between the midpoints of opposite walls. Before setting any tile, do a dry lay from that center point and adjust your starting position if border cuts land narrower than half a tile at any visible edge.
Which way should you lay floor tiles in a kitchen?
The best direction depends on the room's shape, tile format, and the look you're after. Straight grid in a large format suits most modern kitchens. Diagonal layouts add visual space to smaller rooms but increase material waste by 15–20%. Offset (brick bond) is a solid middle ground for rectangular tiles.
What should you put down before tiling a floor?
The subfloor must be flat, stable, and free of moisture issues. Over wood subfloors, install cement backer board or an uncoupling membrane like Schluter DITRA before setting tile. Self-leveling compound addresses dips and high spots that exceed the ANSI flatness tolerance.
What is the 3-4-5 rule for tiling?
The 3-4-5 rule confirms a true 90-degree angle at your starting point. Measure 3 feet along one chalk line and 4 feet along the perpendicular — if the diagonal between those endpoints measures exactly 5 feet, the corner is square.
How much does it cost to install kitchen floor tiles?
Total installed cost (materials plus labor) ranges from $5 to $45 per square foot, per HomeAdvisor; porcelain specifically runs $9 to $50 per square foot installed (Angi). Porcelain costs more to install than ceramic because it's harder to cut, adding labor time — and rates in the tri-state area typically run above the national average.
Can you use porcelain tile on a kitchen floor?
Porcelain is one of the best choices for kitchen floors — its hardness, stain resistance, and near-zero water absorption hold up well under daily cooking traffic and spills. The subfloor must be adequately reinforced to handle its weight, particularly in older homes.
Conclusion
Tiling a kitchen floor with porcelain is a project where preparation and technique determine everything. Install the right tile on a compromised subfloor — without proper mortar coverage or expansion joints — and it will fail, sometimes within a year. Install it correctly, and it can outlast the house.
Experienced DIYers can execute a straightforward square kitchen with a standard grid layout. But kitchens with irregular shapes, structural subfloor issues, in-floor heating, or multiple floor transitions are a different story.
Those projects benefit from professional oversight — where getting the subfloor prep, layout, and installation sequencing right from the start prevents costly mistakes. Broadway Kitchens & Baths offers free design consultations for kitchen renovations in the tri-state area, with showrooms in Englewood, NJ, and Manhattan. Their team handles tile selection, layout planning, and full kitchen remodeling from initial design through final installation. Call (201) 567-9585) or stop by 257 South Dean St., Englewood, NJ.